This guide will walk you through how to use your Cab-1L remote with the Base3. For using the Cab-1L remote with other command bases, such as the Base-1L or Legacy Base2, see their respective user manuals.
The Cab-1L is the simple way to start operating in the LIONEL LEGACY Command Control environment – and an economical way to add operators when running trains with friends! Whether you want to access the basic features of the LEGACY control or operate older TMCC equipment, the Cab-1L remote controller allows you to walk around your layout while controlling your trains. The Base3 receives signals from the remote and sends your commands across the layout. If you are looking to get started with the LEGACY Control System, the combination of Cab-1L and Base3 is the perfect way to start unlocking many of Lionel’s celebrated features. Only one Base3 should be used on a layout. You may use a combination of Cab2 and Cab-1L remotes with a single Base3.
Installing batteries in your Cab-1L remote controller #
Your Cab-1L remote controller is powered by four AA batteries alkaline (not included). To install the batteries, slide open the cover on the back of the remote, and place the batteries in the remote according to the + and – symbols molded in the remote.
A few basic warnings:
• Be sure that the +/- of each battery is positioned as shown in the battery compartment.
• Use only new AA alkaline batteries.
• Never mix new and used batteries or use different types together.
• Remove the batteries from the remote when the remote will not be used for an extended period of time
Connecting Cab-1L to Base3 #
When you are operating in a club environment or a display environment with two or more command bases in operation in close proximity there will be communication problems if both are using the same TMCC remote channel. You must change one of the Command Bases to a new channel and then match the Cab-1L remote you wish to use to that channel.
The CAB-1L communicates with the Base3 at a frequency of 2.4 GHz. Within this band, there are nine distinct channels available to use; the default channel is 1. Chances are, channel 1 will be fine for your layout and you’ll have no need to change channels on your system. However, the 2.4 Ghz frequency spectrum is also used by WiFi, cordless phones, and various other devices you may have near your layout. If you are having trouble maintaining reliable communication between your Lionel remote and layout, experiment with different channels following the instructions shown here.
To learn the channel of your Base3 #
- Press the “Remote Channel” button on the front of your Base3. Watch the Base3 yellow light bar blinking
- Observe and note the number of repetitions
- That number is the channel of your Base3
To change the channel of your Base3 #
Press the “Remote Channel” button on the front of your Base3 again. Each time you press the button the Base3’s channel will change. The channel can be between 1 and 9.
- Watch the Base3 yellow light bar blinking
- Observe and note the number of repetitions
- That number is the new channel of your Command Base
- Repeat to change the channel of your Command Base again.
Your Cab-1L remote must be set to the same channel as your Base3 to operate with it.
To match the channel of your Cab-1L and Base3 #
- Remove the sliding cover over the SET key at the bottom front of the Cab-1L.
- Hold down the SET key and press a number key (1 – 9) to pick the radio channel to transmit on.
- The speaker will beep to give feedback when the channel is configured, either one beep if a base responds, or three beeps if no base responds. The new channel number will be saved.
Both types of beeps mean that a channel has been configured, but if there happens to be a base in range when the channel is set, then the one beep signal means that communication has been established with the base. Three beeps means that no base responded when test commands were transmitted by the Cab-1L during channel configuration. If this happens when a base is within range, then it may be that the base is set to a different channel than the one you just selected for your Cab-1L.
Once you’ve heard the “single-beep” confirming your Cab-1L has connected to a base you’re all set. You can further confirm communication is working by
turning the throttle or pressing a button on your remote. The red LED light bar on your Base3 should illuminate in response to incoming commands.
The system operates on the same frequencies as many other common wireless devices. If you experience signal quality issues, or lack of range between the Cab-1L and Base3, you may need to change channels to resolve the issue.

Base Communication #
Two command base units cannot exist on the same channel. If two bases in close proximity are set to the same channel, range and reliability will be compromised.
Interference from Cameras #
Popular wireless cameras used in the railroad hobby use channel 1-4. Setting the Base3 channel at 5 or above should correct the problem.
Command-equipped Locomotives #
Programming ID #s for your Command-equipped locomotives #
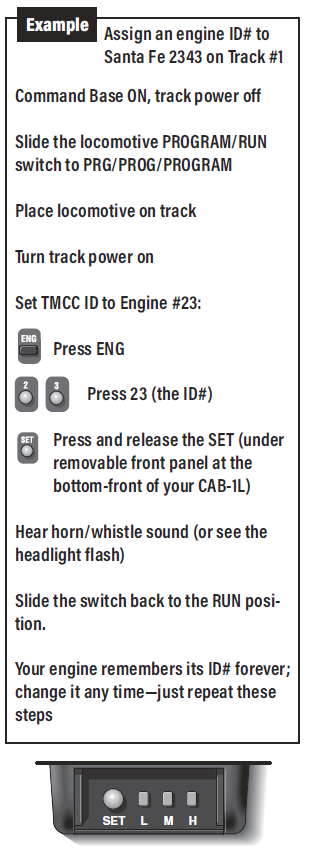
Every Command-equipped locomotive comes factory-programmed with TMCC ID Engine #1. You may wish to assign a new ID#, using any number from 1 through 98 (do not use engine 99, as this is the universal ID# that all LEGACY-equipped locomotives will respond to). To make it easy to remember, try using part of the locomotive cab number. For example, ID your Lionel F3 no. 2343 to “#23” or “#43.” We use 23 in our example.
Here’ s how to give a Command-equipped locomotive its new ID#. Make sure the Command Base is ON. Refer to the Command-equipped locomotive owner’s manual(s) for PROGRAM/ RUN switch locations. Holding the locomotive, slide its control switch to the PRG, PROG or PROGRAM setting. Place the locomotive on track and power up your railroad.
Using CAB-1L, press ENG, the ID# (any number 1 to 98), then press and release the SET button located under the removable panel on CAB-1L. Hear the horn or whistle blow, or the headlight flash. This confirms your new ID #. Slide the switch back to RUN and you’re ready to go.
Want to change your locomotive’s ID#? Just repeat these steps any time.
Addressing Locomotives #
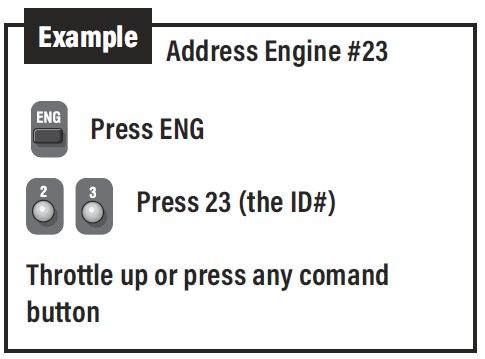
To operate a Command-equipped locomotive, press ENG and its ID# on CAB-1L. Turn the throttle or press any command button; the sound system starts up (equipped locomotives) and the engine is ready to begin operations.
Activating whistle quilling on Legacy locomotives (optional) #
The Quilling Whistle is a key feature of LEGACY locomotives. “Quilling” allows you to continuously vary the intensity of the whistle, creating your own unique signature sound. By default, CAB-1L sends TMCC style horn commands in order to be compatible with non-LEGACY locomotives. Because LEGACY locomotives respond to these older commands, too, you’ll still hear horn or whistle sounds, but you won’t be able to quill.
To set Quilling horn/whistle for one engine or train ID:
Remove the sliding cover to expose the SET key at the bottom-front of the CAB-1L.
Select a current engine or train in the usual way by pressing either ENG and enter the ID# or
TR and enter the ID#.
- Hold down the SET key and press the WSTL/HRN key to toggle the whistle configuration
- between TMCC1 and LEGACY style for the current engine or train. The CAB-1L will beep once
- if the TMCC1 whistle style is selected, or it will beep twice if the LEGACY quilling whistle is selected instead.
Repeat this process for each LEGACY locomotive ID. Note that this horn setting for engines and trains is saved internally within the CAB-1L itself. This means that if more than one CAB-1L is being used on your layout, each one must be programmed to set the horn style for a given engine or train. The CAB-1L will remember the settings until you change it.
Note! Remember that older TMCC1 locomotives don’t support quilling and won’t sound at all in response to LEGACY quilling commands. If an engine stops responding to the WSTL/HRN button, but its bell is working correctly, change back to TMCC1-style whistle for that particular Engine ID and all will be well.
Sending basic commands to locomotives with Cab-1L #
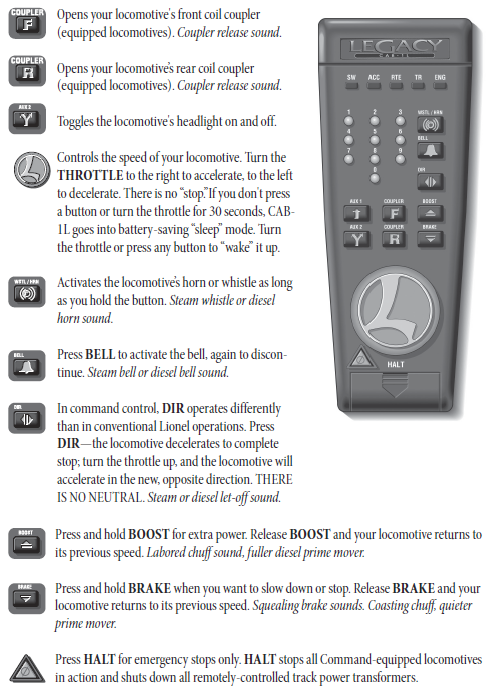
The corresponding RailSounds sound system effects are in italic type. Some locomotives may not support all listed features.
Tuning your locomotive’s performance #
Setting Momentum #
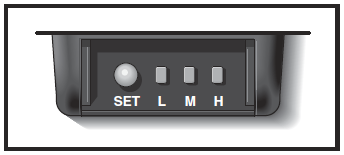
The LEGACY system’s momentum feature simulates the labored performance of a real life locomotive pulling a heavy load. Press L, M, or H (located under Cab-1L’s removable panel) for light, medium, or heavy momentum. The locomotive remembers this setting until you change it. For normal (quick) locomotive response, press L.
Get a feel for the difference in momentum settings. Select L, M, or H. Turn your throttle slightly and wait a few seconds for the locomotive to respond.
Note that on LEGACY locomotives, L, M and H settings change the number of individual speed steps your locomotive supports. A setting of L gives 32 speed steps, M yields100 speed steps and H provides 100 speed steps with added momentum.
Setting Stall #
Make your locomotive feel more responsive with stall (this tip is especially applicable to Pullmor powered TMCC locos). Get your locomotive moving and press SET; the locomotive will stop. Tum the throttle clockwise to get the engine moving, then decrease speed until the locomotive just stops. Press SET again. Even if your locomotive doesn’t move after turning the throttle, just press SET again. Stall will be set. Your locomotive remembers the stall setting until you change it. To clear stall, press SET twice, holding it for one second each time.
STALL EXPLAINED:
Set a command-equipped locomotive’s stall, and it skips from zero power to stall when you turn the throttle. Stall eliminates unnecessary throttle rotation—making your locomotive more responsive.
Note! Not all engines support Stall.
Sending numeric commands to locomotives #
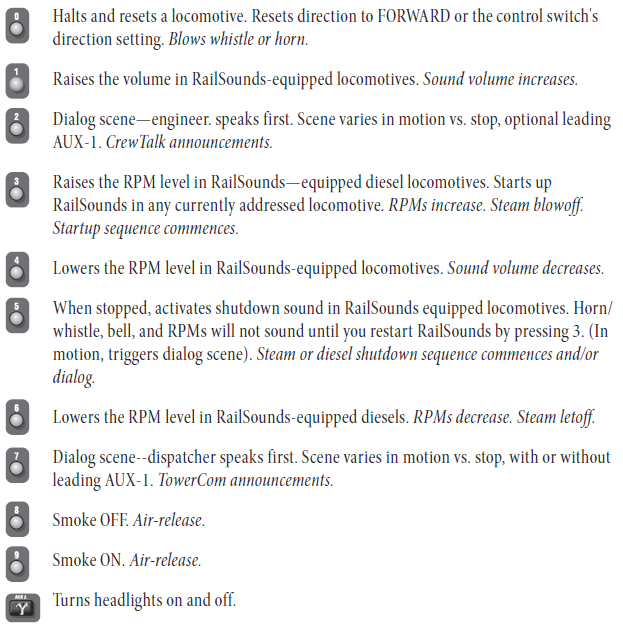
When you address a locomotive and press any non-numeric button such as AUX1, you enable 10 numeric command buttons. Turning the throttle or entering more than two digits for a locomotive address will also enable numeric commands. The numeric keypad issues commands listed below until you press any top-row button (SW, ACC, RTE, TR, or ENG). The corresponding RailSounds sound system effects are in italic type.
Switches #
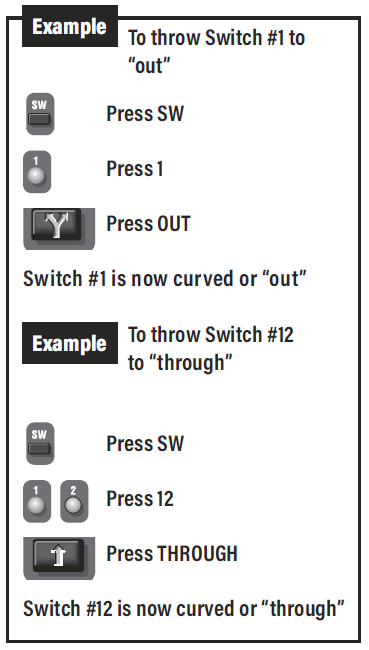
Controlling switches with the Cab-1L #
Once you’ve programmed switch ID numbers (refer to the manual that came with your switch controller for this procedure), you can operate any TMCC remote-controlled switch using the Cab-1L.
Note: SWITCH SHORTHAND. After addressing a “switch”, you can immediately address another switch simply by entering its ID#—you don’t have to press SW again. This is so until you press another address button (ACC, RTE, TR, or ENG).
Notes on AUX1 and AUX2 #
AUX1 and AUX2 are multi-definition buttons. Their definitions depend on which top-row address button (ENG, SW, ACC, etc.) you most recently pressed.
For example, press SW and AUX1/ AUX2 to control the direction of switches. Press ENG or TR and AUX1 “opens” the numeric keypad to locomotive feature control, while AUX2 controls headlight illumination. Finally, when you press ACC, the buttons change meaning again, this time to control accessory functions.
As you get comfortable with “jumping’’ between locomotives, switches, accessories, routes, and multi-locomotive lash-ups (“trains”), you’ll acquire a feel for the many definitions of AUX1 and AUX2. Until then, just remember our basic CAB-1 rule: AUX1 and AUX2 functions always depend on which top-row address button you’ve just pressed.
Creating routes around your railroad #
Every model railroad has switches, which provide plenty of operational variety, especially when thrown in certain patterns—a route.
Here’s a common scenario: to travel from the main line to the yard, you have a preset route: Switch #2 is through (straight), Switch #4 is out (curved), and Switch #14 is through. If your switch controller supports Routes, you can throw all those switches with a single command—RTE.
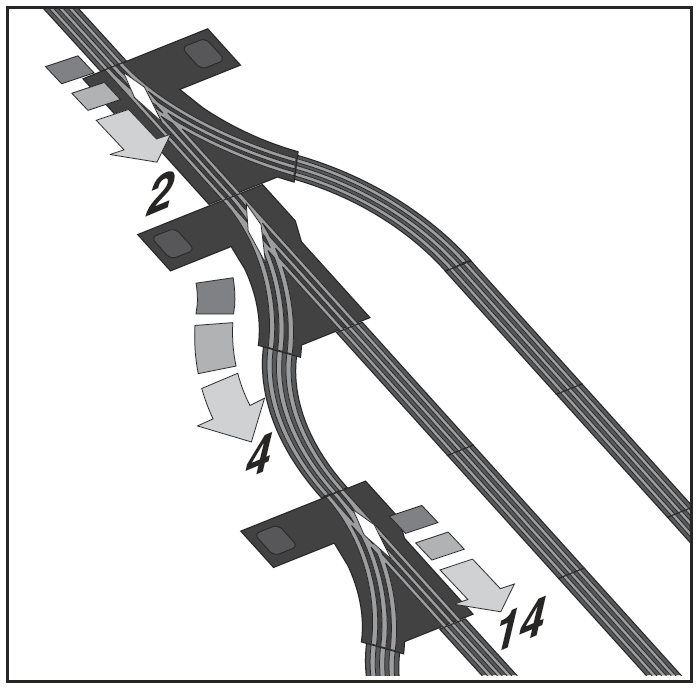
Note: SWITCHES AND ROUTES. Any switch can be part of any route. And any switch can be on any number of routes, creating a wealth of possibilities. Experiment. Discover new pathways around your railroad with RTE. Routes are remembered forever—or until you clear them.
Note: Always check your RTE programming: throw switches opposite the RTE direction, then press RTE and the ID#; your route should immediately throw.
You can add more switches to a route at any time.

Activating routes #
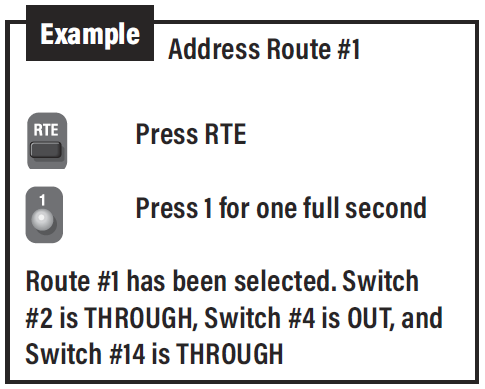
Select any route you’ve programmed by pressing RTE and your chosen RTE ID#. Make sure you press and hold the ID# button for one full second. This ensures the command is issued to every switch controller on your railroad.
Note: “PRESS AND HOLD”. When you are pressing the ID button, some of the switches may not actually throw until you’ve released the button. Switches activate at different times once you’ve selected the route
this keeps your system (and your railroad’s power supplies) from overloading due to simultaneous activation of multiple switches.
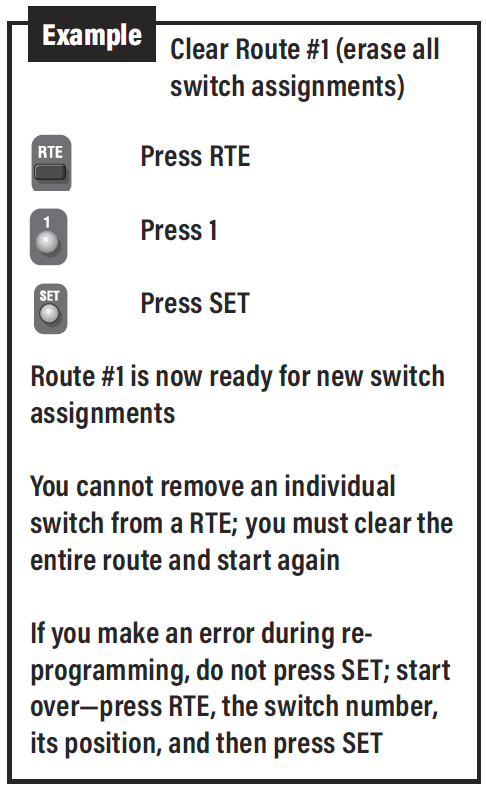
Clearing routes #
Clearing an existing route requires an abbreviated version of programming a new route. In this case, do no add any switches to the route. This removes and switches previously stored as part of this route.
The TR Button #
Tracks or Trains
The TR button on your Cab-1L can control two very different things—“TRains,” or remotely controlled “TRack” power accessories. You can run both from the same Cab-1L, as long as every one has a unique ID#.
Let’s talk TRACK power for a moment. Lionel offers a variety of accessories which provide remote control over track power. These enable you to remotely turn on and off power to all or some of your layout. In addition, some of these accessories allow you to vary the AC voltage applied to the track so you can run conventional (non-command controlled) locomotives on a command layout. You may also use variable track voltage to fine-tune performance of your accessories and command-controlled locomotives.
To operate these track power control devices (for example, a LEGACY PowerMaster), you’d assign them a unique TR ID#. Then they’d be addressed in the same way you’ve learned to operate a locomotive: by pressing TR and the ID# of the track power accessory you want to control. Refer to your track power accessory manual for specific information on setting these IDs and other operating instructions.
The second use for the TR button, as we’ve noted, is to create and operate “Trains,” a combination of two or more locomotives and/or Command Control-equipped rolling stock, also referred to as a “lash-up” in the world of Lionel. Once you’ve grouped several things into a train, they operate together, as a single locomotive.
A couple of important notes. First, older TMCC1 era equipment only supports TR commands 1-9. This is true for both track power accessories such as the original PowerMaster as well as older TMCC1 locomotives.
Lionel LEGACY locomotives and power accessories such as the LEGACY PowerMaster accept TR commands addressed from 01-99! So if you’re having trouble getting a piece of equipment to respond to TR commands, first try assigning it to TR 01-09 and see if that works. If that works, but higher numbered TR commands (10 and up) are ignored, stick with ID’s 1-9.
A further note about combining locomotives into TRAINs. Older TMCC1 and newer LEGACY locomotives cannot be combined into a single TRAIN. You can make TRAINs from two or more LEGACY engines, or two or more TMCC1 engines, but you cannot assign a mix of old and new locos to the same TRAIN ID#.
For more information on using remote track power accessories, refer to those product’s owner’s manuals.
FCC Statement #
The Lionel CAB-1L is covered by FCC rules for a Class B computing device. As required by FCC regulations, the following is provided for the information and guidance of the user. This equipment has been tested and found to comply with the limits for a Class B digital device, pursuant to Part 15 of the FCC Rules. These limits are designed to provide reasonable protection against harmful interference in a residential installation. This equipment generates, uses, and can radiate radio frequency energy. If not installed and used in accordance with the instructions, it may cause harmful interference to radio communications. However, there is no guarantee that interference will not occur in a particular installation. To determine if the equipment does cause interference to radio or television reception turn the
equipment off and on. The user is encouraged to try to correct the interference by one or more of the following measures: (1) Where it can be done safely, reorient or relocate the receiving antenna; (2) Increase the separation between the equipment and receiver; (3) Connect the equipment into an outlet on a circuit different from that to which the receiver is connected; and (4) Consult your Lionel dealer or an experienced radio/ TV technician for help.
Changes or modifications not expressly approved by Lionel L.L.C. could void the user’s authority to operate the equipment.


